Quick Start Guide
Connect your instrument into the 1/4” INPUT.
Connect a compatible power supply (9V center negative, min. 500 mA) to the power connector.
- Connect at least one of the following:
- Headphones into the headphone jack
- USB-C cable between the USB connector and your computer*
- Instrument cable between one of the balanced 1/4” outputs and your amplifier’s input
- XLR cable between DIRECT OUTPUT and your mixing desk or audio interface
The Microtubes Infinity is pre-programmed with three presets, A, B, and C that are selectable via the dedicated footswitches. Press and hold one of the footswitches for two seconds to save your changes into a preset. Three additional presets can also be accessed via MIDI or the Darkglass Suite.
Adjust the level (and headphone volume, if applicable) to your liking and start playing!
*Using the Microtubes Infinity as an audio interface may require some extra steps depending on your operating system
Connections
Input: This is the primary instrument input on the Microtubes Infinity. Connect your instrument or output from your pedal board to the 1/4” mono jack.
Aux In: The stereo input of the Microtubes Infinity enables the playback of backing tracks while practicing or recording. Connect your mobile phone, laptop etc. to the 1/8” stereo jack.
Headphone Output: The headphone output can handle headphones with an impedance of 16 – 600 ohms. Connect your headphones to the 1/8” stereo jack and set the desired level from the dedicated potentiometer next to the jack.
Balanced Outputs: The two balanced outputs add routing versatility and the option of using the Microtubes Infinity as a fully equipped audio interface. Connect your studio monitors, amplifier or other effects to the 1/4” balanced jacks using a TRS connector (Tip +, Ring -, Sleeve GND).
If you feed an unbalanced input from these outputs, use an instrument cable with a mono 1/4” plug.
Direct Output: An XLR output with a ground lift switch provides a reliable standard connection to a mixing desk or an external audio interface for a guaranteed low-noise signal.
MIDI In: A standard 1/8” TRS (Type B) jack allows connecting an external MIDI controller to the Microtubes Infinity for even more flexibility. Read more about the MIDI capabilities at https://www. darkglass.com/creations/microtubes-infinity/
USB: The USB-C port unlocks the Microtubes Infinity’s USB audio interface capabilities and enables interaction with the Darkglass Suite desktop app, allowing for software updates and access to the Darkglass IR library, containing hundreds of cabinet simulations. USB MIDI is also supported.
Signal Chain
The position of the Cabsim block in the signal chain can be changed from the Suite.
Block Diagram
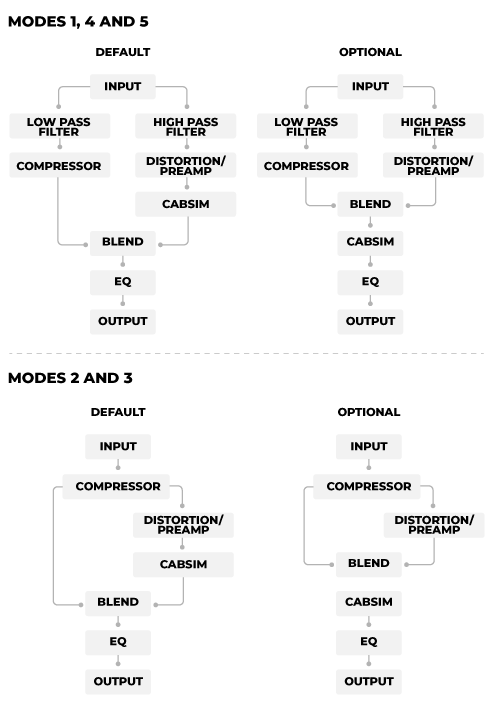
Compressor: This control allows setting the input gain of the compressor that will translate into how much the signal is compressed while our intelligent make-up gain algorithm keeps the output of the compressor at usable levels. The compressor has 5 ratios available: 4:1, 8:1, 12:1, 20:1 and ALL IN.
Distortion: The Microtubes Infinity has 5 different preamp modes; a clean multi-band tube preamp, Microtubes B3K and Vintage Microtubes distortions in both normal and multi-band modes.
Cabinet Simulation: The Microtubes Infinity supports Impulse Response (IR) cabinet simulations and has 5 cabinet slots on board. The default IRs have been selected by the Darkglass Team. New IRs can be assigned to the 5 slots using the Darkglass Suite (desktop or mobile).
Blend: The blend control allows you to mix the distorted/preamp signal with the clean sidechain signal. Depending on the distortion/preamp setting the clean sidechain is either full-band or low-band signal.
EQ: Last in the signal chain is a programmable 6-band graphic equalizer that allows you to tailor your sound even further. The full description of this functionality can be found in the “Controls” section of the manual.
Controls
Smart Potentiometers
On the Microtubes Infinity, you will find five smart potentiometers: Compression, Drive, Mod, Blend, and Level. These potentiometers are the main interface for sculpting the signal chain and your overall sound on the Microtubes Infinity.
The Compression potentiometer is the one-knob solution for compression on the Microtubes Infinity. This controls the amount of input gain to the compressor and intelligently applies the correct amount of makeup gain so that your signal is always driven at the appropriate level, no matter how much compression is applied.
The Drive potentiometer adds distortion and drive to our signal (modes 2-4) or blends in the tube preamp emulation (mode 1). Crank this knob to add more saturation or character to your distortion/preamp part of the signal chain.
The Tone/Era potentiometer allows you to go from dull to crisp and anything in between. On the Vintage Microtubes (modes 2 & 4) you get the coveted ERA control which covers different decades of classic bass tones.
The Blend potentiometer mixes between the distortion signal and the clean sidechain signal.
The Level potentiometer controls the master volume of the Microtubes Infinity.
The smart potentiometers allow for their positions to be stored in each preset, with the stored position indicated by the ring of LEDs surrounding each potentiometer.
With this, you can get a glance at your signal chain settings when changing presets, regardless of the physical potentiometer setting.
Touch Sensitive Slider
At the center of the Microtubes Infinity are the touch-sensitive sliders that control the 6-band graphic EQ at the end of the signal chain.
Each slider has a -12 dB to 12 dB range. From left to right, the frequency bands for each slider correspond to a low shelf, 250 Hz, 500 Hz, 1.5 kHz, 3 kHz, and a high shelf. You can also change the frequency bands to 100 Hz, 200 Hz, 400 Hz, 800 Hz, 1.6 kHz, 3.2 kHz in the Darkglass Suite.
Controlling the touch sliders is easy – swipe upwards to boost a frequency band or swipe downwards to cut a frequency band.
When swiping, the position of the slider is also reflected on the potentiometer LEDs. Double-tap the slider to reset the band back to 0 dB.
Hint: The sliders respond to the direction of your swipe on any part of the slider, so you can make small adjustments without your finger covering the actual position of the slider.
Rotary Footswitch Encoders
Below the touch sliders are three rotary footswitch encoders -∞, 𝟢, and +∞, which can be pressed or rotated. These footswitch encoders enable many of the Microtubes Infinity’s functions. Simply press A, B, or C to switch to the preset stored in that footswitch.
The rotational position of each encoder is displayed on the five LEDs under each encoder. Additionally, when rotating, the position is shown on the potentiometer LEDs – this is a visual aid that does not affect the potentiometer configuration.
- Rotating -∞ allows you to change the compressor ratio or bypass the compressor.
- Rotating 𝟢 allows you to change the distortion mode or bypass the distortion.
- Rotating +∞ allows you to change the active IR in the signal chain or bypass the IR.
- When none of the five LEDs are lit, the respective compressor/distortion/IR is bypassed.
Rotating 0 allows you to bypass or change the distortion mode. The modes are:
- Clean tube preamp
- Vintage Microtubes
- Microtubes B3K*
- Vintage Microtubes multi-band*
- Microtubes B3K multi-band*
* Bluetooth/USB connection and Darkglass Suite application are required to access the extra controls, like GRUNT, MIDBOOST, high-pass and low-pass filter .
Basic Operation
Editing and saving presets
Editing and saving presets on the Microtubes Infinity is remarkably easy. If any of the parameters are changed (i.e. potentiometers, sliders, encoder rotation), the color LED of your current preset will gently breathe, indicating that the edit or audition mode is active.
Auditions are an easy way to try new sounds and settings, which can be either saved or discarded. When you find a sound that you would like to save, the audition can be saved into any of the three presets by pressing and holding one of the preset footswitches for two seconds. All LEDs on the Microtubes Infinity will flash rapidly a few times indicating that your edits have been saved into a preset.
A new audition is always entered when changing any parameter from an unedited/saved preset. This will overwrite any previous unsaved auditions/edits.
During an edit/audition, you can change to any of the three saved presets by pressing the footswitch associated with that preset. After changing to a preset, pressing the footswitch again will swap between that preset and your active editing session.
Presets can also be saved, edited, shared, loaded, and managed in the Darkglass Suite.
For instructional videos on editing and saving the presets, please visit https://www.darkglass. com/creations/microtubes-infinity/
Tuner
To enter the tuner, press 0 and +∞ simultaneously.
To exit the tuner, press 0 and +∞ simultaneously or one of the footswitch presets. The Microtubes Infinity will always return to the last active preset. The Microtubes Infinity will not output any audio when tuning.
The Microtubes Infinity features a five-octave chromatic tuner, which can tune any note between A0 and A#5, allowing you to dial in any guitar or bass tuning that you desire. The tuning is derived from A4 = 440 Hz. Only one note can be tuned at a time.
When the tuner mode is entered and there is no input signal, two red LEDs on the two rightmost sliders are shown by default. When an input signal is received, the left section of sliders will update to show the note that you are tuning.
A small indicator is displayed to the top right of the note if it is a sharp note.
When tuning, the two rightmost sliders will update to show how close your tuning is from the note’s perfect pitch. Distance below the center line indicates that the note is tuned flat, and distance above the center line indicates that the note is tuned sharp. The red LEDs will transition to green as you approach the perfect pitch, and the slider and preset LEDs will fully illuminate in green when you are on perfect pitch.
Bypass
To enter the bypass mode, press -∞ and 𝟢 simultaneously.
To exit the bypass mode, press -∞ and 𝟢 simultaneously or one of the footswitch presets.
In this mode, the Microtubes Infinity does not perform any processing on the input signal, and passes the unprocessed input signal through to the outputs. All LEDs are turned off during bypass mode.
Performance Lock
To enter or exit the performance lock, press A and C simultaneously.
In this mode, all LEDs will gently breathe on the Microtubes Infinity to indicate that it has been locked.
This mode prevents any accidental parameter changes or edits to your presets. You can still change between the saved presets A, B, and C, and enter the tuner or bypass modes, but potentiometer updates, slider touches, or encoder rotations will not respond to any changes.
Tip: Enter the performance mode after the soundcheck while playing live gigs.
Bluetooth Pairing
To begin Bluetooth pairing with the Microtubes Infinity, press and hold an encoder while simultaneously rotating the encoder. The five LEDs under each encoder will illuminate one-by-one, and pairing will begin when all five are lit. Look for “Microtubes Infinity” on your list of available Bluetooth devices.
USB Audio Interface
Whatever your DAW of choice is, it’s compatible with the Microtubes Infinity. You can record your processed signal to one track and simultaneously record an unprocessed copy to another track. Recording a stereo track at the same time from the Aux input is also possible.
The Microtubes Infinity supports 48 kHz and 44.1 kHz sampling rates.
Setting up the drivers
If you are using a Mac, no additional drivers are required to use the Microtubes Infinity as an audio interface. If you are using Windows, please download the latest USB audio drivers from https://www.darkglass.com/ suite/. Please refer to the Darkglass website for more details regarding USB audio.
USB Routing
USB output (to Microtubes Infinity)
· Output 1: Balanced left + Headphone left
· Output 2: Balanced right + Headphone right
· Output 3: Balanced left
· Output 4: Balanced right
· Output 5: XLR DI (mono)
Both Mac and PC send system audio to outputs 1 and 2 by default, so you can always use the Microtubes Infinity’s stereo output of choice without having to set up any extra routing.
The level of these outputs is controlled by the small volume potentiometer at the top of the Microtubes Infinity. The other outputs have no volume control on the Microtubes Infinity.
USB input (from the Microtubes Infinity)
· Input 1: Processed signal
· Input 2: Unprocessed raw signal
· Input 3: Aux left + Bluetooth left
· Input 4: Aux right + Bluetooth right
Audio Routing
When the Microtubes Infinity is not bypassed, the Level potentiometer always controls the volume of your instrument input at all four outputs, and has no effect on the USB/Aux/Bluetooth audio.
When the Microtubes Infinity is bypassed, the Level potentiometer has no effect.
Your instrument, Aux input, and Bluetooth audio is routed to the headphone and balanced outputs. The media volume at these outputs can be controlled with the small potentiometer at the top of the Microtubes Infinity.
- When using the balanced outputs, the media volume and instrument volume level are separately controlled (small volume potentiometer at the top of the Microtubes Infinity and the Level potentiometer, respectively).
- When using headphones, the volume is controlled in the same way, with one exception: the headphone volume potentiometer acts as an overall master volume for both media and your instrument input.
- The XLR DI output is routed only with your instrument output and USB output 5.
The media playback volume level on the Microtubes Infinity is not applied to USB inputs 3 and 4.
Darkglass IR Library
The Darkglass Suite software currently comes with an extensive library of IR files and hundreds more will be added in the near future. The library consists of both bass and guitar cabinets. Captures of Darkglass Elite Series and Neodymium Series cabinets are available, among others.
Technical Specifications
Input impedance: 1 MΩ
Output impedance: 220 Ω
Current consumption: ~500mA
Voltage: 9VDC (center negative)