Before we get started
Before we get started, there are a few things we need to do to make sure your Exponent stays in tip-top shape!
Select the correct voltage
Before plugging in e500, please ensure that the voltage selector on the back of the unit is set to the correct mains voltage.
Use an appropriate load and cables
The speaker output has a minimum load of 4 Ω.
Never use the speaker output with an instrument cable.
e500 can be operated without a cabinet.
Use the right MIDI cable
Use the 7-pin MIDI connector only with the Darkglass MIDI footswitch.
Use the 5-pin MIDI connector with other MIDI equipment.
Getting started
Connecting your gear
Connect your instrument with an instrument cable to the main ¼” input jack on the front panel.
Connect to one or more of the following:
• Mixing desk or audio interface with the XLR output.
• Headphones to the headphone output.
• Outboard gear to the FX loop.
• Speaker output to a cabinet using the speakON Combo jack.
• 4 Ω minimum load.
• A speakON or a ¼” speaker cable can be used.
• Never use an instrument cable.
By default, the speaker output is muted when headphones are connected. This can be disabled in the Darkglass Suite.
Potentiometers
There are seven potentiometers on the front face of e500.
Set input gain with the INPUT pot.
Set master volume with the MASTER pot.
The XLR output is unaffected by the MASTER volume.
The remaining five pots are Exponent 500’s Quick-Pots.
Changes to the Quick-Pots are automatically saved.
The current position of each Quick-Pot is always shown on its surrounding LEDs.
Chromatic tuner
The chromatic tuner is always active in both bypass and mute and tunes to any note between A0 to A#5.
The note being tuned is shown on the matching Quick-Pot letter: tuning A shows on Quick-Pot A, tuning B shows on Quick-Pot B, and so on.
- Tuning F is shown on Quick-Pots A and B.
- Tuning G is shown on Quick-Pots D and E.
Sharp notes are displayed on the preset LEDs, when the dim preset LEDs turn fully bright.
Clipping indicators
Exponent 500 has clipping indicators that show signal clipping at different parts of the signal chain.
Exponent 500’s Quick-Pots flash red while clipping.
When Quick-Pots A and B flash red, the instrument input is clipping. Reduce input gain with the INPUT pot.
When Quick-Pots D and E flash red, at least one of the outputs is clipping (XLR/speaker/headphones). Reduce the level of the signal chain, or use the Mixer to reduce the output levels.
When Quick-Pots C and D flash red, the FX return is clipping. Reduce the output volume of your outboard effects.
When Quick-Pots B and C flash red, the FX send is clipping. Reduce the level of the signal going to the FX send in the Darkglass Suite.
In the Darkglass Suite, you can use the Mixer to individually adjust the levels of each output and the FX send/return.
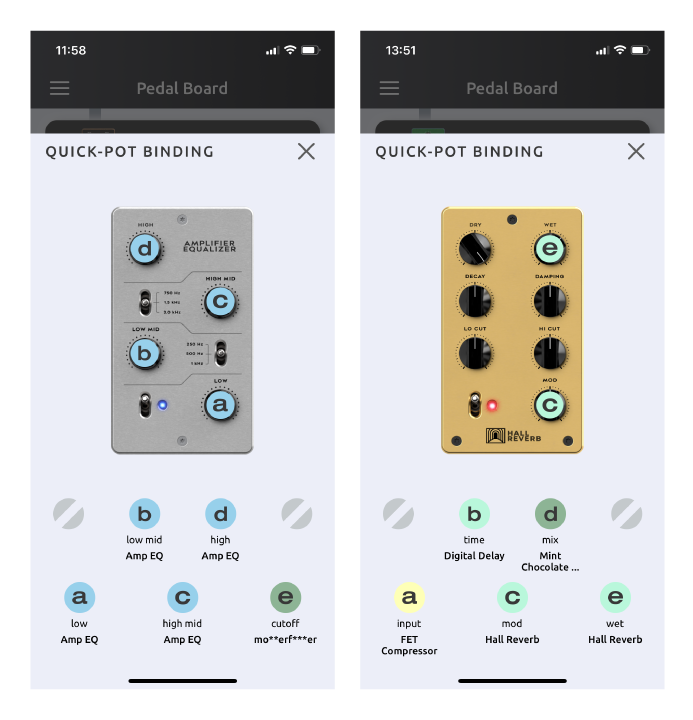
Quick-Pots
There are five Quick-Pots on Exponent 500’s front panel.
By default, these pots are mapped to the Amp EQ’s four frequency bands and a preset-specific control.
In the Darkglass Suite, you can freely bind the Quick-Pots to your selection of any five controls from the effects in your signal chain.
The Quick-Pot feedback shown on the ring of LEDs depends on the type of control that is bound. The color displayed on the Quick-Pot is determined by the type of the effect it is bound to.
For example, a Quick-Pot bound to one of the Amp EQ’s bands is centered at the 12 o’clock position. Moving the pot left of center reduces the band’s level, and moving the pot right of center increases the band’s level.
A Quick-Pot bound to the FET Compressor ratio will act like a switch with five positions. Similarly, bypass and other switch controls show the appropriate feedback. And, of course, Quick-Pots can act like traditional potentiometers.
Quick-Pots are bound if there is a color on the center RGB LED. Quick-Pots without bindings have no LED feedback.
Changes to the Quick-Pots are automatically saved to the active preset.
Using the Darkglass Suite
Exponent 500 comes preloaded with five versatile factory presets. Using e500 with the Darkglass Suite isn’t necessary, but we recommend it!
Darkglass Suite unlocks the full potential of Exponent 500 by providing an interface to interact and modify the signal chain running on each preset.
Use the iOS or Android versions of the Darkglass Suite to create, edit, share, and apply presets. Please make sure your Darkglass Suite version is 4.3.0 or newer!
Connecting to the Suite
Long-press the preset button to start Bluetooth pairing. The preset LEDs will breathe white while pairing.
Open the Darkglass Suite and press Pair. After a short moment, you should be connected and the Pedal Board will be visible.
Basic navigation
The Pedal Board is the main overview of your signal chain where you can construct your presets.
One preset is shown at a time. Each of the five presets can be accessed using the five dots at the bottom of the screen.
Tip: Pressing an active preset’s dot will switch to e500’s bypass channel!
The signal chain is processed from top to bottom. Effects at the top of the signal chain are processed first, and their output is fed into the next effect, and so on. Physical outputs are shown as smaller blocks, representing the FX loop, speaker output, XLR, and headphones.
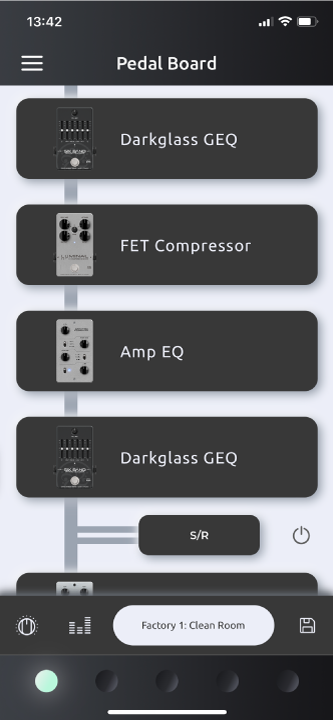
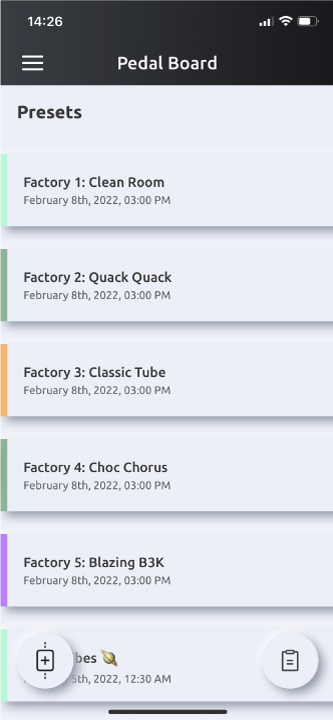
Presets view
Pressing on the preset name on the Pedal Board opens the Presets view. This contains a list of all of your presets.
By default, this list contains the five factory presets. Other presets that you store or import will also be found in this list.
Press the Signal chain button to return to the signal chain overview.
Press the Import button to import presets via preset sharing codes.
Preset syncing with the MyPedal Cloud is coming soon!
Presets
On Exponent 500, you have full control over each preset’s signal chain. Effect configuration, placement in the signal chain, physical output and FX loop routing, Quick-Pot bindings… it’s up to you!
There are only a couple rules. There is a maximum of eight effects per preset, and the total CPU load of the effects in your preset cannot exceed 100%. Only one cabinet simulation effect can be added to each preset.
The MASTER volume level is global on Exponent 500 and is not part of the preset data.
Creating a preset
Let’s create a preset! To speed things up in this example, we’ve already added a Vintage Microtubes and a Flamingo Flanger to the signal chain.
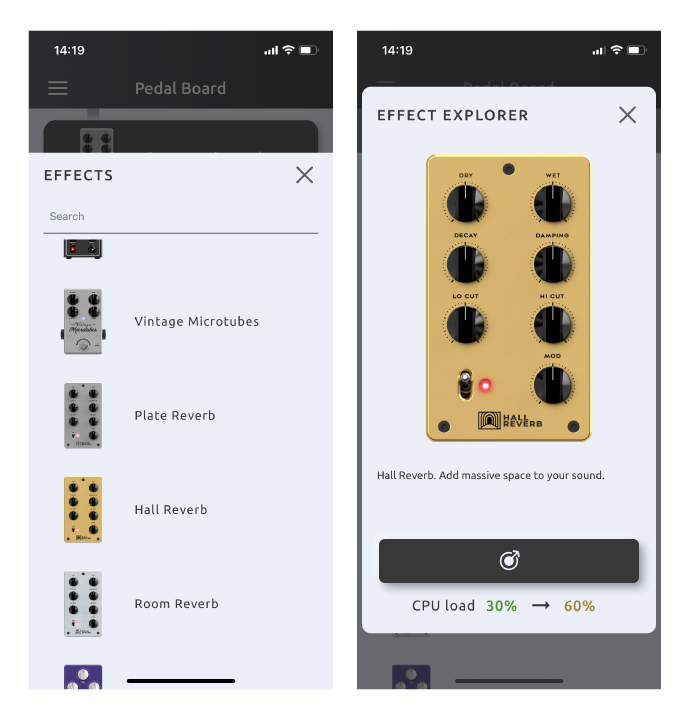
To add an effect to the signal chain, press the + button at the bottom of the signal chain to browse the list of effects.

Adding effects
Open the list of effects by pressing + at the bottom of the signal chain.
Every effect available is listed here. Scroll through the list to find EQs, compressors, distortions, modulations, and utilities.
Selecting an effect from the list of effects opens the Effect Explorer. This shows a preview of the effect, a short description, and a CPU load value if this effect is added to the signal chain.
Note that an effect must be added to the signal chain before it has an audible effect and can be tweaked!
Tip: Swipe left and right in the Effect Explorer to preview effects in the list!
Press the Load button to add the effect to the signal chain.
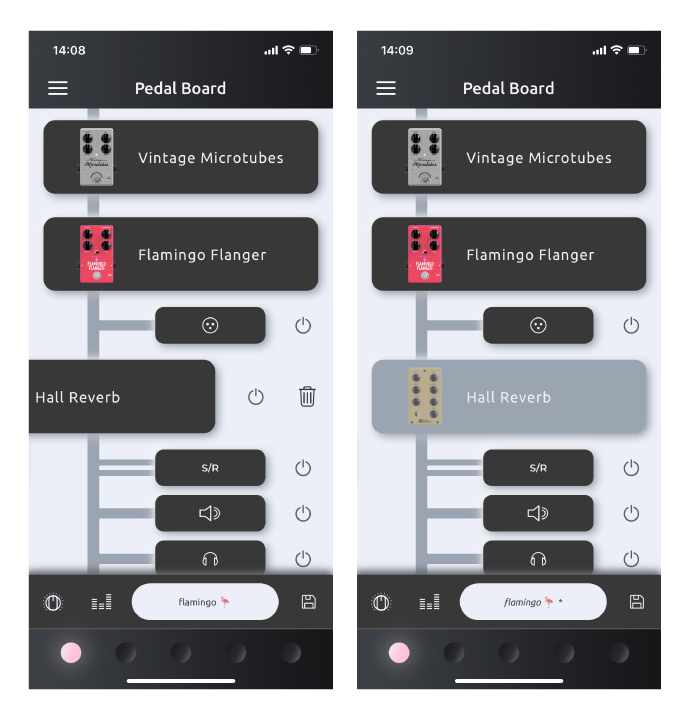
In this example, the Hall Reverb is being added to the signal chain.
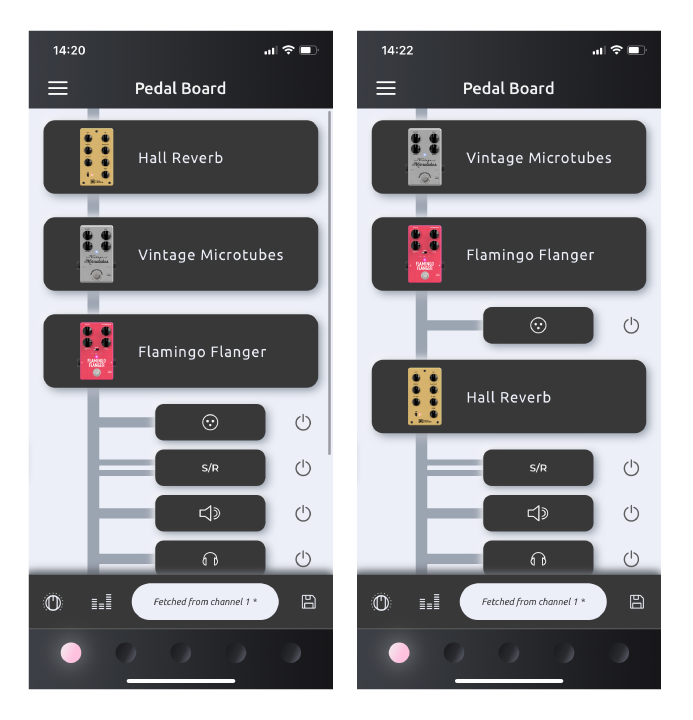
Editing the signal chain
By default, effects added to the signal chain are placed at the top of the signal chain.
Move effects and the outputs/FX loop by dragging and dropping each block.
In this example, the Hall Reverb is moved after the XLR output. This means that the processed instrument signal sent to the XLR output has only been processed with the Vintage Microtubes and Flamingo Flanger.
The same signal is then processed with the Hall Reverb, and sent to the FX loop, speaker output, and headphones output.
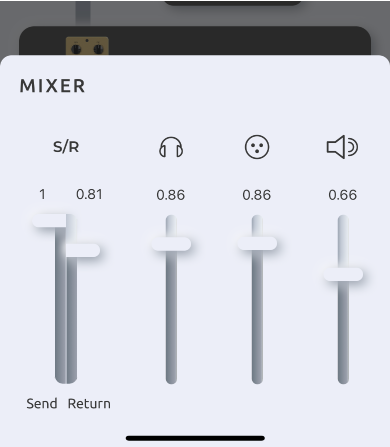
Use the Mixer to set the levels of each of the outputs and FX send/return. Mixer settings are unique to each preset.
Editing effects
Tap on any effect in the signal chain to bring up the Effect View.
In the Effect View, you can interact with the effects in your current signal chain. Changes made in the Suite will be updated in real-time on Exponent 500.
Swipe up and down in the Effect View to view and edit each effect in your signal chain.
The current effect’s CPU load is shown along with the total CPU load of the current preset.
Press the Reset button to reset the effect’s settings back to default.
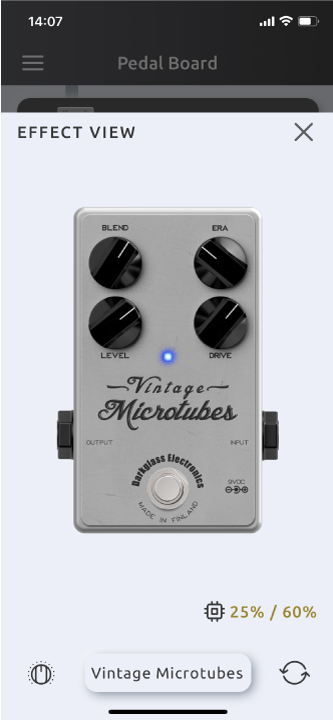
Tip: Press the effect name at the bottom of the Effect View to swap effects in place!
Note that updating effects with the Quick-Pots and changing presets with the preset button does not automatically refresh in the Suite. Pull-to-refresh the signal chain or change presets with the Suite to pull the latest changes from Exponent 500.
Press the Binding button to access the Quick-Pot Bindings.
Quick-Pot Binding
Press the Binding button to access the Quick-Pot Binding view.
Here, you can select five controls from your signal chain to bind to the front panel of Exponent 500.
Swipe up and down to select an effect from your signal chain.
Tap on a control to open the binding menu. In the binding menu, you can select which Quick-Pot the control is mapped to.
In this example, the Vintage Microtubes drive is bound to Quick-Pot E.
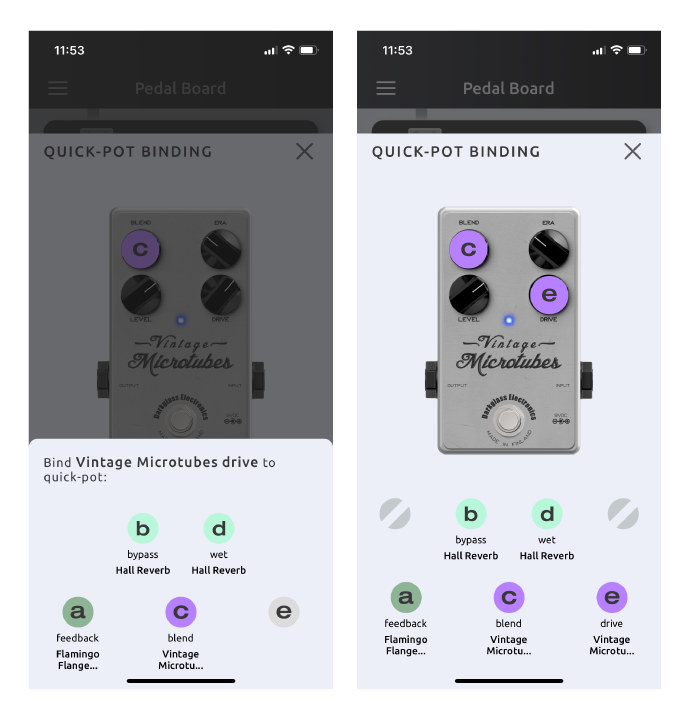
Tip: Tap on bound Quick-Pots to jump to that effect in the Binding view!
To unbind a Quick-Pot, tap on the bound control. Select Unbind from the Binding menu.
Preset color selection
Each preset has a unique color assigned to it.
Long-press on the preset dot at the bottom of the screen to open the color selection.
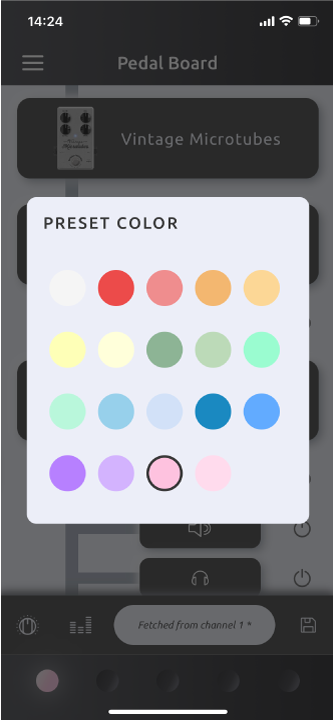
Color changes are automatically applied and saved to Exponent 500.
The color will be visible on the front panel preset LEDs when the preset is active.
Storing presets
Presets and changes made directly on Exponent 500 are automatically saved to Exponent 500’s internal memory.
While Exponent 500 has five preset channels, you can store as many presets as you like in the Darkglass Suite. These presets can then be applied to one of Exponent 500’s preset channels or shared with a preset sharing code.
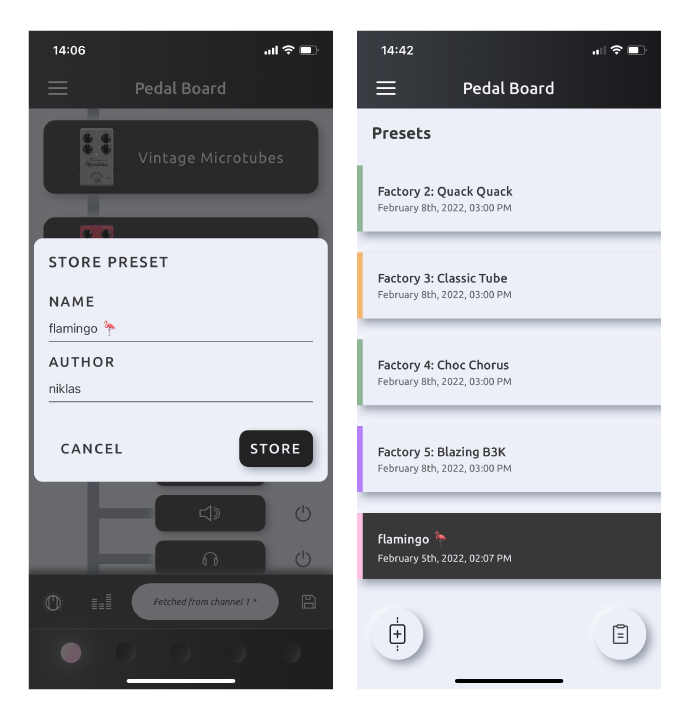
From the pedal board, press the Store button to store the preset in the Presets view. Give the preset a name and author and press Store.
The signal chain configuration, effect settings, output and FX loop routing, Quick-Pot bindings, preset color, and mixer settings are stored in the preset.
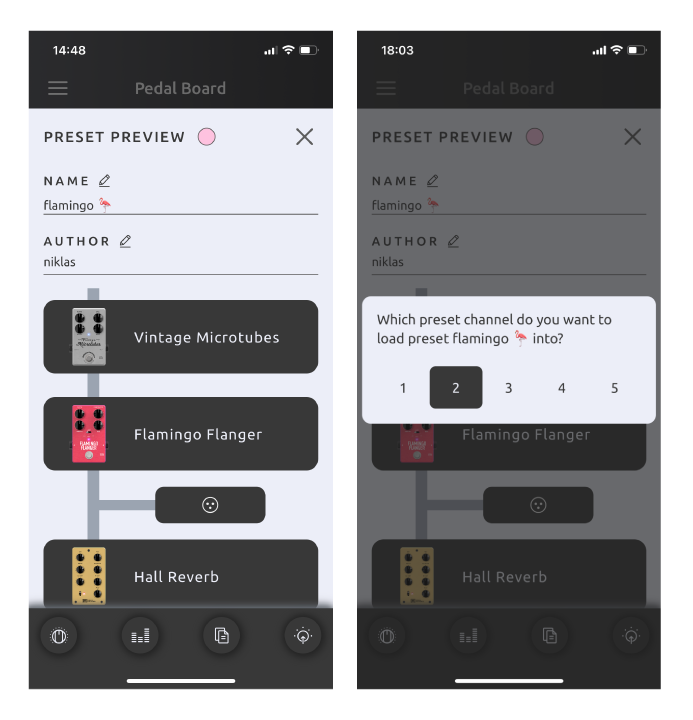
Previewing, sharing, and loading presets
From the Presets view, tap on a stored preset to open the Preset Preview. This allows you to preview the preset’s signal chain, Quick-Pot bindings and mixer settings . The preset name and author can also be modified.
Presets can be shared with others. Press the Copy button to generate a preset sharing code. This code is automatically copied to your clipboard.
Tip: Preset sharing codes also work as offline backups!
Press the Load preset button to load the preset to a preset channel of your choice. When loading presets, Exponent 500 will automatically change to the correct preset channel.
Importing presets
Import presets via preset sharing codes using the Import button in the Presets view.
When the preset sharing code is on your clipboard, press Paste preset code to enter the code. The name and author of the preset is shown after pasting.
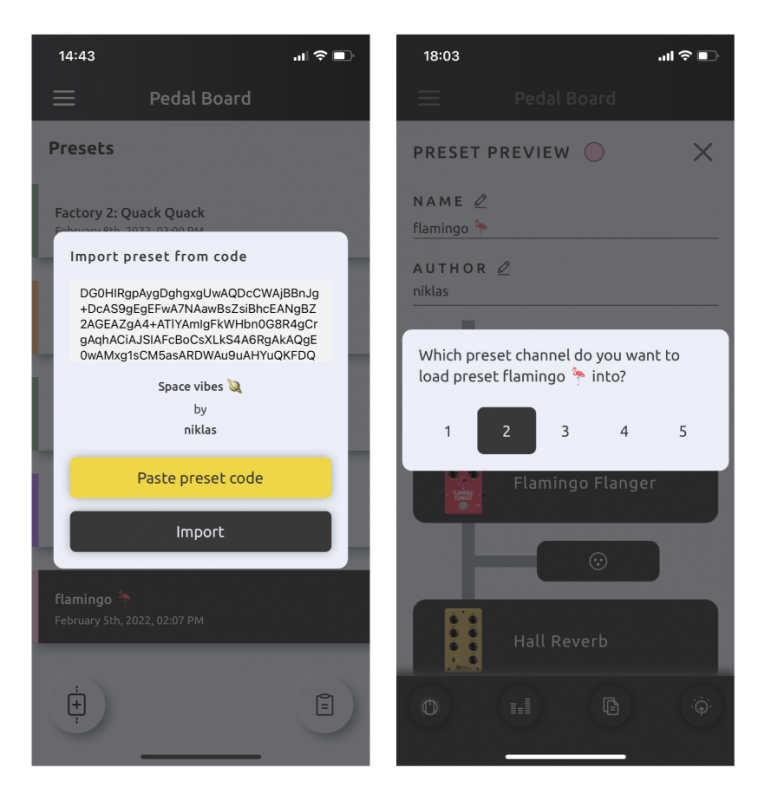
Press Import to open the Preset Preview. You can preview the preset’s name and author, signal chain, Quick-Pot bindings , and mixer settings.
Store the preset in your preset list by pressing the Store button .
The preset is now stored in your list of presets.
Tips and tricks
Quick effect actions
Quickly bypass an effect by swiping left on the effect and pressing the Bypass button. This is equivalent to bypassing the effect in the Effect View.
Delete effects from the signal chain with the delete button.
Quick preset actions
Swipe left on stored presets in the Presets view to quickly load presets or delete them from the preset list.
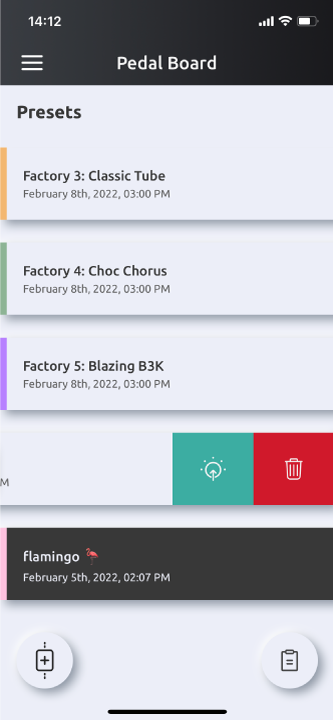
Factory presets cannot be deleted.
MIDI
Exponent 500 supports MIDI input on the back panel connector and MIDI input/output over USB.
Use a 7-pin MIDI connector only with the Darkglass MIDI footswitch. Use a 5-pin MIDI connector with other MIDI equipment.
MIDI on Exponent 500 works much like having physical control of the unit. Program Change (PC) messages are used to select presets, bypass, and mute, and Control Change (CC) messages control the Quick-Pots and master volume.
MIDI switch type
The MIDI switch type determines how Quick-Pots bound as switches respond.
Per-value: CC value increment sets the next switch position.
Full-range: the entire CC value range (0 to 127) is directly translated to the switch position.
USB MIDI
USB MIDI IN behaves identically to MIDI received via the back panel connector.
Quick-Pot and master volume changes are sent via USB MIDI OUT as CC messages, and match the configured MIDI mapping.
SysEx messages from any MIDI input are also passed to USB MIDI OUT.
MIDI configuration
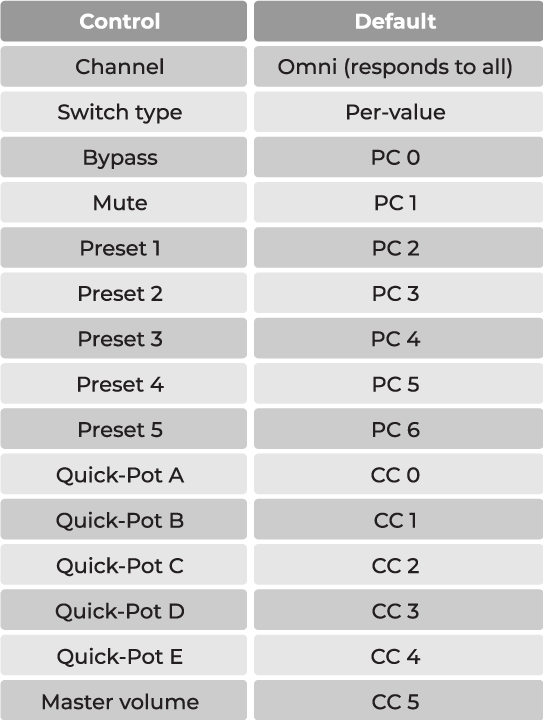
Exponent 500’s MIDI configuration can be fully customized in the Darkglass Suite. The default MIDI configuration is the following:
USB audio interface
Exponent 500 can be used as a USB audio interface.
Exponent 500 supports 48 kHz and 44.1 kHz sample rates.
If you are using a Mac, no additional drivers are required to use Exponent 500 as an audio interface.
If you are using Windows, please download the latest USB audio drivers from https://www.darkglass.com/suite/. If you already have the drivers installed, please make sure that the driver’s version is 5.30 or higher.
USB audio channel routing
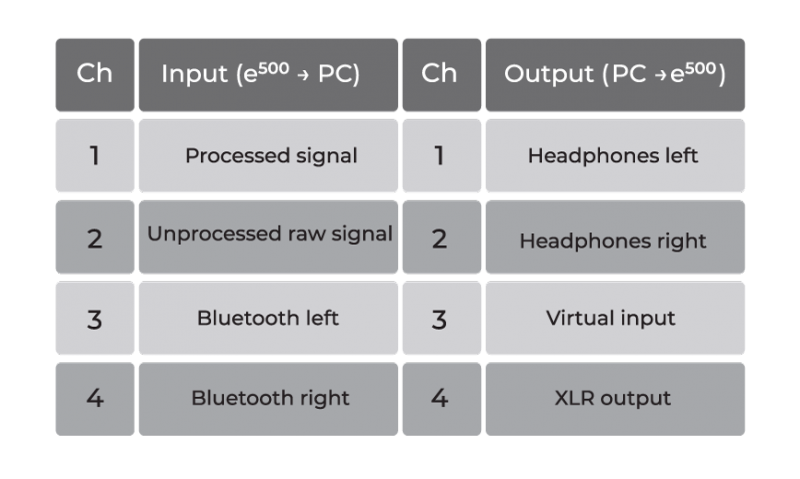
The processed signal input is the signal at the very end of the signal chain.
The virtual input can be used for reamping from your DAW. Audio passed to this channel is mixed with the instrument input.
Bluetooth audio
Bluetooth audio can be streamed to the Exponent 500. Bluetooth audio is sent to the headphone output.
If Exponent 500 is not already paired with your device, begin pairing by long-pressing the preset button. All preset LEDs will breathe white for the duration of pairing.
Once paired, to connect with audio, select Exponent 500 from your device’s Bluetooth pairing menu. e500’s audio profile can also be renamed in this menu.
Make sure that your device’s media output volume is not muted and you should be ready to jam!
The A2DP standard is used for Bluetooth audio streaming.
In the system Bluetooth menu, Darkglass Suite and Bluetooth audio connections are shown as two separate instances.
Settings
The Settings menu provides some additional options for configuring Exponent 500.
Custom name
Give your Exponent 500 a custom name by editing the Name field. e500 must be powered off and on for the name change to take effect.
Automatic speaker mute
By default, the speaker output is muted when headphones are connected. When headphones are disconnected, the speaker output is unmuted.
This behavior can be disabled with the Mute speaker when using headphones option. When disabled, headphone connection has no effect on the speaker output.
If this setting is disabled and headphones are connected, the speaker will immediately unmute.
Firmware update
Exponent 500 supports firmware updates over Bluetooth.
The Darkglass Suite will automatically notify of an available firmware update.
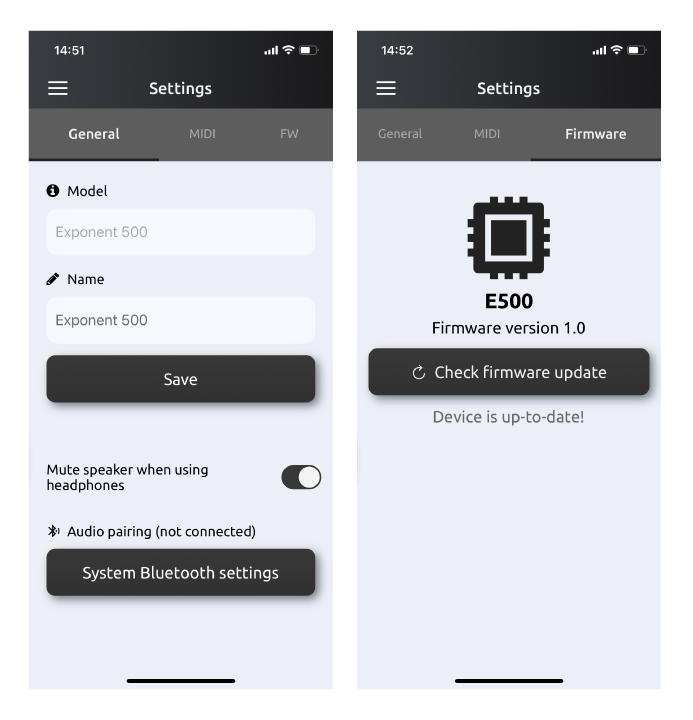
During the update, please do not disconnect Exponent 500 or close the Suite. Exponent 500 will automatically restart following the firmware update.
Technical Specifications
- Fully digital audio processing
- Can be operated without a cabinet
- 500 watt amplification, voltage selector for 100-120 /200-240 VAC, 50-60 Hz
- ¼” instrument input
- Input impedance: 1 MΩ
- Maximum input level at minimum gain before clipping: 19.5 dBu (7.3 Vrms)
- Input gain potentiometer
- 40 dB of gain
- Six digitally read potentiometers
- Five Quick-Pots and the master volume
- USB-C
- MIDI in/out
- Audio interface
- 4 input channels and 4 output channels
- 48 kHz or 44.1 kHz sample rate
- Bluetooth (BLE and A2DP)
- MIDI input
- 7-pin DIN connector only with Darkglass MIDI footswitch
- 5-pin DIN connector with other MIDI equipment
- Effects loop
- Maximum send level before clipping: 12.8 dBu (3.4 Vrms)
- Maximum return level before clipping: 12.8 dBu (3.4 Vrms)
- Headphone output
- Maximum output level before clipping: 13.3 dBu (3.6 Vrms)
- Output impedance: <1 Ω
- Speaker output
- speakON / ¼” combo jack
- Minimum load impedance: 4 Ω
- XLR direct out, unaffected by master volume
- Maximum output level before clipping: 2.2 dBu (1 Vrms)
- Chromatic tuner, notes between A0 and A#5
- Fan cooling, 1600 to 3800 RPM
Dimensions
Width: 21 cm / 8.3″
Length: 17.5 cm/ 6.9″
Height: 6 cm / 2.4″
Weight: 1.65 kg / 3.64 lb
Warning
- Please ensure that the voltage selector on the back of the unit is set to the correct mains voltage before powering up Exponent 500.
- The speaker output has a minimum load of 4 Ω. Never use an instrument cable with the speaker output.
- Use the 7-pin MIDI connector only with the Darkglass MIDI footswitch.
- Use the 5-pin MIDI connector with other MIDI equipment.
No user-serviceable parts inside the amplifier. Do not open the amp. - Never use the amp at a high moisture environment or near liquids.
- The Exponent 500 can deliver ear-shattering sound pressure levels. Exposure to this level of sound can damage your hearing. Use proper hearing protection.
- The Exponent 500 can deliver more than 500 watts. Be sure that your speaker cabinet is able to deliver that power.
- Do not cover the vent holes. The fan and vent holes are part of the cooling system of the amp. Covering the vent holes can damage the power amp by overheating it.
- Don’t use an instrument cable as speaker cable. An instrument cable is not designed to deliver the type of power signals sent from the amplifier to the speaker.
Warranty
Please register for your warranty at http://mypedal.darkglass.com. The Exponent 500 is under warranty to the original owner for a period of two years against manufacturing defects in the country where the product was originally purchased.
If you experience a problem with the unit, please contact support@darkglass.com to receive a Return Authorization number or for information on the nearest authorized repair center. A copy of your original receipt must be included with all warranty repairs. You are responsible for all shipping charges. The unit must be shipped to us freight prepaid. We will return the unit freight collect. Darkglass Electronics Oy is not responsible for shipping damage either to or from our service center. Claims must be filed with the carrier.
For repairs please contact your local dealer or distributor for your country’s specific warranty period and repair procedures. Darkglass®, Microtubes®, and Microtubes Engine are registered trademarks of Darkglass Electronics OY.